Consumables
Veritas distributed by Sibress: highest precision for the measurement of anilox rollers

Friday 11. August 2023 - The corresponding distribution agreement was concluded for the entire European area as well as the neighbouring countries. Sibress has already been selling the worlds leading white light interferometer MD3Dqc since 2011.
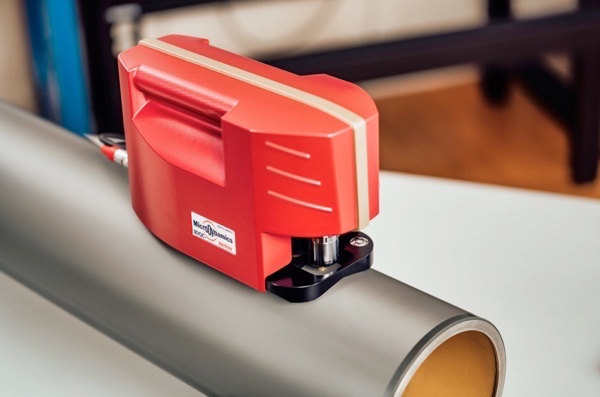
Sibress, manufacturer of measurement and analysis systems for quality assurance in flexographic and package printing from Starnberg near Munich, has now taken over the distribution of the Veritas measurement microscope from MicroDynamics, USA, in addition to the products it has developed itself. The corresponding distribution agreement was concluded for the entire European area as well as the neighbouring countries. Sibress has already been selling the world’s leading white light interferometer MD3Dqc since 2011.
The technological speciality of the completely newly developed system lies in its range of applications and precision. White light interferometry is used to determine the measurement results. This method uses the interference of a broadband light as a reference for scanning the object. The robustness and mechanical precision of the optical microscope system allow a resolution of up to 0.25 µm
Nikon’s 10x and 20x microscope objectives, which have been completely redesigned for the system, cover the line count range between 25 and 800 L/cm (60-2000 LPI). Particular attention was paid to a user-friendly user interface in the new development. The intuitive user guidance of the software enables the user to analyse the anilox cylinder surface without prior knowledge.
Fully automatic analysis in only two steps
After setting up the Veritas microscope, the typical time from scan start to the evaluation of all acquired data, including 3D image, is less than 10 seconds. Focusing the surface once enables the focus to be found automatically during further measurements.
In the evaluation, all relevant data, such as: cell depth, volume, angle, surface texture/roughness, wall thickness, opening angle and much more, is displayed.
The measurement results are logged just as easily afterwards. After the evaluation, the measured values as well as the 3D image of the measurement are available in the log for storage or printing. In this way, individual measurements can be carried out or two measurements can be compared with the integrated deviation analysis. Furthermore, logs can be created in a database and thus measurement results from different periods can be compared. This makes it possible to quickly determine whether the anilox rollers are still suitable for use.
Factory calibration
The measuring system is supplied calibrated. If required, a calibration roller certified by MicroDynamics can be purchased. It can then be used as a reference to check the system.
The system runs on Windows 10 Professional with USB 3 for fast data transfer.
The scope of delivery includes the measurement microscope with the standard 20x lens objective (120-2000 LPI), cables and a computer with pre-installed Veritas software.
